목표
- 리눅스 1대와 윈도우 1대를 Samba로 연동
- 리눅스/윈도우 모두 같은 사용자가 공유 폴더 제어하게 설정
환경 설정
개념 및 설정
Samba
- smbd(139/tcp, 445/tcp)
- nmbd(137/udp, 138/udp)
/etc/samba/smb.conf
/etc/samba/lmhosts
작업 과정
1. Samba Linux
1
2
| useradd -m -G wheel smblinux
echo "smblinux" | passwd --stdin smblinux
|
1) Samba Linux 설정
1
2
3
4
| sudo dnf update --exclude=kernel* -y
sudo dnf install -y samba samba-client cifs-utils
sudo systemctl enable --now smb nmb
|
1
2
3
| sudo systemctl enable --now firewalld
sudo firewall-cmd --permanent --add-service=samba
sudo firewall-cmd --reload
|
 1
 2
 3
 4
 5
 6
 7
 8
 9
10
11
12
13
14
15
16
17
18
19
20
21
22
| cd /etc/samba
sudo cp -p smb.conf.example smb.conf
sudo vi /etc/samba/smb.conf
workgroup = WORKGROUP
server string = server1
hosts allow = 127. <Client-IP>
...
# samba-share: window에서 뜨는 폴더명
# 윈도우 접속시: \\ip\samba-share
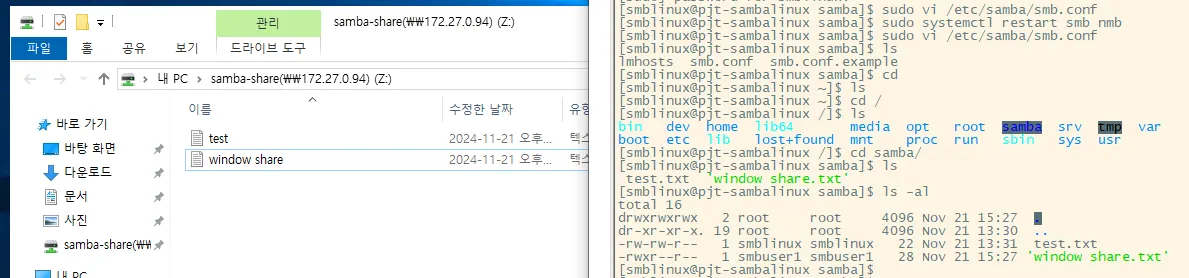
# 계정명: smbuser1
[samba-share]
comment = Samba Test
path = /samba
public = yes
writable = yes
printable = no
valid users = smbuser1
|
1
2
| sudo mkdir -p /samba
sudo echo "test written in linux" >> /samba/test.txt
|
1
2
3
4
5
6
7
| sudo useradd -M -s /sbin/nologin smbuser1
sudo smbpasswd -a smbuser1
sudo pdbedit -L
sudo chown -R smbuser1:smbuser1 /samba
sudo systemctl restart smb nmb
|
1
2
| smbclient -L localhost -N
smbclient -L localhost -U smbuser1
|
2. Samba Windows
1) 원격 데스크탑 연결
- ip: 공인 ip
- 사용자: Administrator
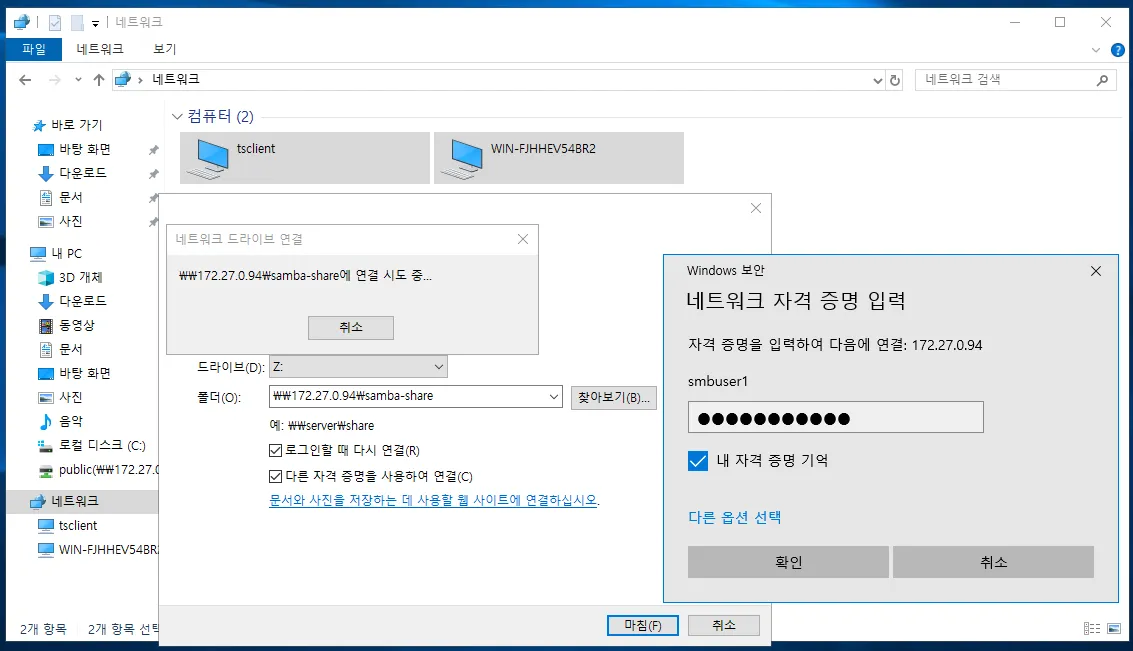
2) Samba 서버 공유 디렉토리 연결
- smb.cnf에서 설정한 대로 네트워크 드라이브 연결
3. Samba Server에서 Client 설정
서버에서 클라이언트 설정 하는 이유
- samba 사용자 smbuser1을 보안을 위해 nologin으로 생성
- 따라서 서버에서 공유 디렉토리에 작업하면 사용자가 smbuser1이 될 수 없지만 윈도우에선 smbuser1으로 작업하게 되므로 권한이 달라짐
- 서버에서 smbuser1으로 작업하기 위해 Samba 클라이언트 설정
1) Samba 서버 테스트
1
2
3
| smbclient //<samba-server-ip>/samba-share -U smbuser1
smb: \> ls
smb: \> get linux1.txt
|
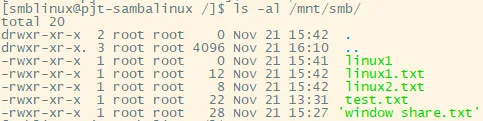
2) Samba 마운트
1
2
3
| sudo mkdir -p /mnt/smb
sudo mount -t cifs //<Server-IP>/samba-share /mnt/smb -o username=smbuser1,password=<password>
|
3) Samba 영구 마운트
noauto,x-systemd.automount 옵션
- samba가 disable일 때 재부팅 시 위 옵션이 설정되어 있지 않다면 부팅 에러 발생
- noauto: 부팅 시에 자동으로 마운트 X
- x-systemd.automount: 파일/디렉토리에 접근할 때 자동 마운트
⇒ 부팅 시에 마운트하지 않고, 접근 시에 자동 마운트
 1
 2
 3
 4
 5
 6
 7
 8
 9
10
11
12
| sudo umount /mnt/smb
sudo vi /etc/samba/credentials
username=smbuser1
password=<password>
sudo chmod 600 /etc/samba/credentials
sudo vi /etc/fstab
# samba mount
//<Server-IP>/samba-share /mnt/smb cifs credentials=/etc/samba/credentials,noauto,x-systemd.automount 0 0
|
1
2
3
| sudo systemctl daemon-reload
sudo systemctl restart mnt-smb.automount
systemctl status mnt-smb.automount
|
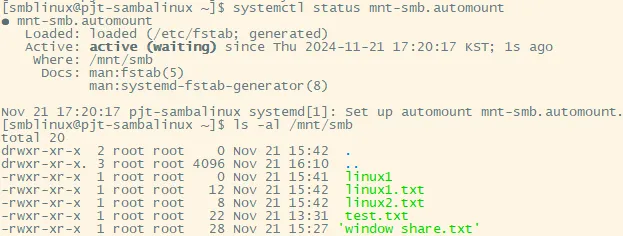
- 마운트된 디렉터리 /mnt/smb에서 작업해야지만 smbuser1 사용자로 작업 취급
참고
samba:
https://ujia.tistory.com/70#google_vignette
x-systemd automount:
https://docs.redhat.com/ko/documentation/red_hat_enterprise_linux/8/html/managing_file_systems/proc_using-systemd-automount-to-mount-a-file-system-on-demand-with-etc-fstab_mounting-file-systems-on-demand